Blog
6 Critical Steps for Cleaning and Protecting Your Dental Instruments

Does Your Office Follow the CDC’s Guidelines Correctly?
 Instruments must be properly taken care of if they are to function as they were intended, for as long as they were intended. A safe and efficient cleaning process will protect the investment you’ve made in high-quality dental instruments.
But in truth, there’s more than just money at stake. Dental health professionals are on the front lines of the war against infection. The process you use to clean and sterilize your instruments is one of your most important and effective tools to protect your instruments, your patients, and yourself.
The Centers for Disease Control (CDC) published their Guidelines for Infection Control in Dental Health-Care Settings, and they remain the gold standard that dental offices use today. In these guidelines, instrument processing plays a central role in preventing the transmission of infection. As it should: Your dental instruments come into contact with and often penetrate patient soft tissues. If your instruments are harboring microbes, infection can take hold quickly.
Below, we’ve outlined some best practices to follow when cleaning your dental instruments. Follow them closely to minimize the risk of infection transmission and ensure the longevity of your instruments.
1. Protect Yourself
Personal protective equipment (PPE), including safety eyewear, face masks, impermeable smocks, and gloves protect you from microbial contamination as you clean and organize instruments. It also prevents you from passing on to the instruments any infectious agents you may be harboring.
Utility gloves are especially important when cleaning dental instruments since accidents can and do happen. Gloves that are puncture- and chemical-resistant and that can be disinfected in a steam autoclave between uses are a must-have for any dental office.
Some dental professionals complain that utility gloves never fit well; they’re too big and bulky. But not all gloves are unwieldy. With better, more comfortable options – such as Hu-Friedy’s Lilac Utility Gloves, which come in a variety of sizes – compliance in your practice will increase.
2. Pre-Soak Your Instruments
In some busy practices, you aren’t always able to clean your instruments immediately after using them. This can be a problem, because biological debris (blood, for example) left on instruments may dry out and harden — not unlike dirty dishes left on the counter overnight. When it comes time to clean the instruments, this hardened material can be difficult to remove.
Infection control experts recommend spraying soiled instruments with a solution to keep organic buildup moist. Enzymatic spray gels are an effective option that can easily break down any buildup until you’re ready to properly clean the instruments.
3. Clean Before You Steam
If debris remains on instruments before they go into the autoclave, the superheated steam may not be able to contact the full surface of the instrument. For this reason, CDC guidelines require you to clean any visible material from instruments before you sterilize them.
 There are a few different ways to do this, including:
- Ultrasonic cleaning: This uses sound waves passed through a solution to shake debris loose. The right ultrasonic solution will be specifically formulated for efficient ultrasonic cleaning and will contain enzymes to help break down bioburden, as well as agents to prevent mineral build-up, spotting, and corrosion.
- Automated instrument washers: These washers can save time by eliminating the need to manually rinse or dry the instruments.
- Manual scrubbing: This is a fallback practice, not recommended by the CDC. It demands the most time and effort and carries the highest risk of sharps accidents.
How will you know your cleaning method is working? The CDC emphasizes the importance of monitoring the cleaning process. Monitor strips (for ultrasonic cleaners or Instrument processing and sterilization: Key considerations,” published online November 15, 2016) Molinari recommends loading packages on racks and placing them on their edges to give the sterilizing agent plenty of room to circulate.
4. Dry Your Instruments
Prior to sterilization in an autoclave, it’s critical to dry your instruments thoroughly.
As infection control expert John A. Molinari writes in the February 2016 issue of Dental Economics, sterilizers will only remove the amount of moisture they introduce onto your instruments. If you put your instruments into a sterilizer wet, they will emerge wet. As a result, the packaging (in the next step) will also get wet. And wet packaging can wick bacteria and moisture from human skin through the packaging, which will increase the risk of contaminating the instruments.
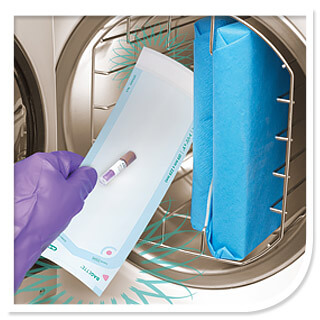
5. Package the Instruments
The last step before placing your instruments in the sterilizer is to package them with wraps or pouches. The package should be sealed to prevent exposure to the air when you remove your instruments from the sterilizer.
Be sure to choose an autoclave wrap that allows the sterilization agent to penetrate and can withstand the harsh conditions of steam sterilization without compromising either softness or strength.
Incidentally, the CDC recommends monitoring the sterilization process. Chemical indicators should be used on the outside and inside of every package to ensure your sterilizer is reaching the proper temperature, is running for the proper amount of time, and the steam is penetrating the packaging.
Biological indicators (also known as spore tests) go a step farther. They’ll tell you if your sterilizer is actually killing microorganisms by testing it against highly resistant strains such as Geobacillus stearothermophilus. The CDC recommends running spore tests at least once per week and with every load containing implantable devices.
6. Load the Instruments Carefully
It can be tempting to try to squeeze as many instruments into each autoclave cycle as you can, however, overloaded sterilizers are the main cause behind failed sterilizations. Overloaded sterilizers take longer to reach the optimum temperature, and when items are packed too closely together, they may not come in contact with a sufficient amount of the sterilizing agent.
In another Dental Economics article ("Instrument processing and sterilization: Key considerations,” published online November 15, 2016) Molinari recommends loading packages on racks and placing them on their edges to give the sterilizing agent plenty of room to circulate.
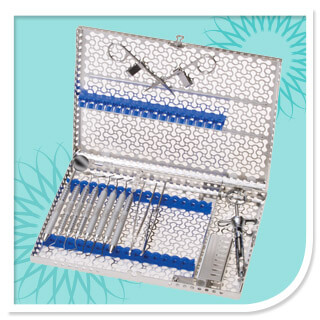
What Role Do Cassettes Play?
Cleaning and sterilizing your dental instruments the right way can be time consuming, especially if you’re handling each instrument individually. Handling individual instruments can also cause sharps injuries, which can cost your dental practice an average of $3,000 per incident according to the CDC’s “Sharps Injury Prevention Workbook”.
The safest and most efficient dental practices package their instruments together into cassettes. Each cassette can be configured for a specific procedure, which means clinicians waste less time chairside searching for the right instrument. Cassettes are also easier and safer to handle since they can be placed directly into ultrasonic cleaners, dental instrument washers and sterilizers and then neatly stored until needed. In fact, dental practices that use Hu-Friedy’s cassette-based Instrument Management System (IMS) save between five and 10 minutes per procedure.
After all, cleaning, sterilizing, and organizing instruments can consume time, and therefore, money. The more streamlined your instrument processing procedure, the more time you and your team can spend treating patients.
And the smarter your practice is about cleaning and sterilizing your instruments, the better equipped you’ll be to stop the transmission of infection. By protecting your instruments, your patients, and your clinicians, you’ll be well on your way to maximizing the investments you’ve made in your practice.
To learn more about IMS and how it works, we’ve developed this helpful guide for you. Or, if you’d like to learn how other practices manage their infection control procedures, download our new eBook, “The Essential Guide to Infection Control”!
